Target Entities
| Entity | Description |
|---|---|
| target_blaster | Triggered blaster fire |
| target_changelevel | Target for a level change trigger |
| target_character | Numbers in a func_clock |
| target_crosslevel_target | Cross level target |
| target_crosslevel_trigger | Cross level trigger |
| target_earthquake | Creates an earthquake |
| target_explosion | Creates an explosion |
| target_goal | Just use a target_secret |
| target_help | Makes help messages appear |
| target_laser | Multiple colors of laser |
| target_lightramp | Fades light in and out, very subtle |
| target_secret | A secret to find in a map, one time use |
| target_spawner | Spawns most items |
| target_speaker | Plays sound |
| target_splash | Splashes different particles |
| target_string | Used with func_clock |
| target_temp_entity | Spawns some large particle effects and lighting |
target_blaster
A simple ent that emulates blaster fire. It must be triggered by something. Either a button, timer, or anything, but it must be triggered.
keypairs
angle: the direction of the firing
damage: default 15, the damage done from each hit
speed: default 1000, the speed of the blaster fire
target_changelevel
This is usually used along with a target_crosslevel_trigger and a target_crosslevel_target.
The target_crosslevel entities are used to trigger unit_wide events. You can press a button in one level, and open a door in another level. These work via eight spawnflags which the crosslevel entities share.
I am too lazy to explain, as these are not used in jump, so here is an explanation from panjoo.
First off, let’s create a room with an info_player_start. Decide where you want your exit to be. Make a brush with the ‘trig’ texture at the area you’ve chosen as the exit, and make it into a trigger. It doesn’t matter if it’s multiple or once, because we’ll be using it to exit anyway. Make a target_changelevel, and give it a key of ‘map’ with a keyvalue of tcex2$from1’. In this case, the ‘tcex2’ is the next example map we’ll be making; ‘$’ means we’ll be going to a specific info_player_start in tcex2; and ‘from1’ will be the targetname of that info_player_start.
Now create another info_player_start, and put it near, but not touching, the exit (preferably facing away from it, but that’s up to you.) Give it a targetname of ‘from2’. This is where you’ll spawn if you come back to this map.
The next thing you need to do is set something up to trigger your target_crosslevel_trigger. This can be a button, item pickup, or anything that can trigger another event. Give it a target (we’ll use tc1 for this example.) Now, create your target_crosslevel_trigger, and give it a matching targetname (again, tc1.) Set the flag for trigger1 in the entity window for your editor. Now, when you trigger it, the trigger1 spawnflag will be set for the next map.
Save the map as ‘tcex1.map’
Now we need another level to go to. Create a room similar to the last, but with two exits this time. Set the keys for one target_changelevel to ‘map’=‘tcex1$from2’ and the other to ‘map’=’*base1’. Place an info_player_start near the exit that goes back to tcex1, and give it a targetname of ‘from1’.
Now, create a target_crosslevel_target and set the trigger1 flag. Give it a ‘target’ of ‘boom’, and a ‘delay’ of ‘2’. Make a func_explosive, and give it a ‘targetname’ of ‘boom’. Save the map as ’tcex2.map
Compile and run the map. If everything worked properly (cross your fingers, it helps) then you should be able to trigger in the first level, and then go into the second level, wait a second, and boom. Just to make sure, try not to trigger the target_crosslevel_trigger before you go into the second map.
For further experimentation, you can set up more than one target_crosslevel_trigger, each with a different trigger flag checked (1, 2, 3…), and then set up one target_crosslevel_target with those flags checked. Only after you’ve triggered all events will the target be fired.
In the example maps, the target_changelevel_trigger is a button. When you come to the second level, a window explodes so you can now exit the map, followed by base1. I hope you find this helpful, as it helped me to make it.
target_earthquake
This creates an earthquake sensation. The earthquake must be triggered and is only viewed locally, it also does not damage players.
keypairs
speed: default 200, the magnitude of the quake
count: default 5, the length of the quake
target_goal
When a level is load, the game counts the number of target_secrets and target_goals in a level. When one of them is found it adds 1 to the total found for each ent. These can also be targetted by a trigger.
A message keypair can be added to display a message when picked up.
target_help
This entity tells you what you need to do to complete the level. This needs to be triggered to work, so it needs a targetname. Set the keypair message to whatever message you want it to print.
spawnflags
1 help1: set this so make the message show up in secondary instead of primary messages
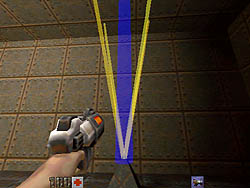
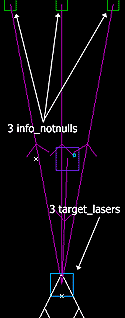
target_laser
A simple to use ent with some other more complicated options. To create a basic laser just put it in the level, give it an angle and color, and you have a laser.
To angle the laser on a diagonal you will need to target a info_notnull. Just place the info_notnull where you want the laser to point.
A moving laser is made by targetting an already set up func_train. Read up on how to make those and it should be easy from there.
You can also trigger a laser on or off using buttons, normal triggers, or you can put them on a func_timer to make them blink on and off independent of the player.
| func_train lasers | info_notnull lasers |
|---|---|
 |
 |
spawnflags
1 start_on: the laser starts on instead of needing to be triggered
2 red: red laser, choose one color
4 green: green laser, choose one color
8 blue: blue laser, choose one color
16 yellow: yellow laser, choose one color
32 orange: orange laser, choose one color
64 fat: a larger laser, can still choose a color
keypairs
angle: can choose normal angles, or -1 for up, or -2 for down
dmg: default 1, the damage a laser does to you
target: can target an info_notnull to go diagonal or a func_train to create a moving laser
targetname: name of the laser if being triggered
target_lightramp
A subtle lighting effect that can be applied to an existing light. What this does is slowly fade the light in or out. The light value on the light will represent the brightest the light will ever be.
keypairs
speed: the time in seconds it will take to fade the light in or out
message: Two letters only, a-z, refer to the explanation in light on how letter lighting works. For example, if you want it to fade from dark to light, use az, if you want it to fade from dark to light use za.
spawnflags
toggle: allows the lightramp to work more than once
To create a lightramp, first create the light you wish to control and give it a targetname. Then create the lightramp and make it target the previously made light. Give the lightramp a targetname as well, so you can trigger it later on. Finally create a trigger, button, of func that will turn the lightramp on or off.
target_spawner
This is used to spawn any item in the game. Although it was mostly used in the single player campaign to spawn misc_gib and misc_insane.
keypairs
target: the name of the entity you wish to spawn, ie misc_insane
targetname: the name of the spawner
speed: the speed the item will come out of the spawner, if not set the item will just be dropped
angle: the direction the item is spawned, and if a speed is set, the direction the item will be thrown
To use this, place the target_spawner in the map, and give it a target of the name of the ent you wish to spawn. Now create a func_timer and target the spawner with it. Use the start_on spawnflag for the timer unless you also want to trigger the timer with another button or method.
target_speaker
An extremely important entity for creating a vibe in your levels. Creates various types of sounds in your level.
keypairs
noise: The sound file that will come out of the speaker. You can find all the vanilla sounds here. You will likely be using world sounds for most use cases. An example of this would be a machine rattling noise by using world/amb17.wav If you would like to use a custom sound, make sure the file is in mono wav format.
attenuation: The distance the sound will travel before fading out. -1 means there is no fade out and the whole level will hear the sound. 1 is for normal fighting sounds. 2 is idle sound level. 3 is for ambient sounds and looped sounds. The default if not set is 1.
volume: Can range from 0.0 to 1.0, where 1.0 is the loudest. The default is 1.0. If you have multiple speakers in an area it will slightly increase the volume overall, but not substantially.
spawnflags
1 looped_on: If set, the sound will start on when the level is started and stay on until triggered. Sounds that are looped will always have a volume of 1.0 and an attenuation of 3. It cannot be overridden.
2 looped_off: If set, the sound will start off when the level is started and stay off until triggered. Sounds that are looped will always have a volume of 1.0 and an attenuation of 3. It cannot be overridden.
4 reliable: Marks the sound as important, which will override other sounds that might be playing at the same time.
256 Not in Easy: Will Not spawn in easy mode.
512 Not in Normal: Will Not spawn in normal mode.
1024 Not in Hard: Will Not spawn in hard mode.
2048 Not in DM: Will Not spawn in deathmatch mode.
looping sound hack
Because looped sounds are forced to be attenuation 3, it means they cannot be played over the entire level. To get around this, you can create a func_timer with a wait keypair of slightly longer than the lenght of the sound file. Then target an attenuation -1(whole level) speaker with the the timer. This will then let you play a looped sound across a whole level.
target_splash
These are the little floating particles you will see above water, slime, and other splashing areas. To create the splash, start by placing the target_splash where you want it, giving it a targetname and specify the # of the splash you want with the sounds keypair. THen give the splash a count for how many splash particles you want. Then create a func_timer and target the splash. Typically you want to use the start_on spawnflag.
| # | type |
|---|---|
| 1 | sparks |
| 2 | blue water |
| 3 | brown water |
| 4 | slime |
| 5 | lava |
| 6 | blood |
keypairs
sounds: the above table has the options
count: how many splash particles that will show
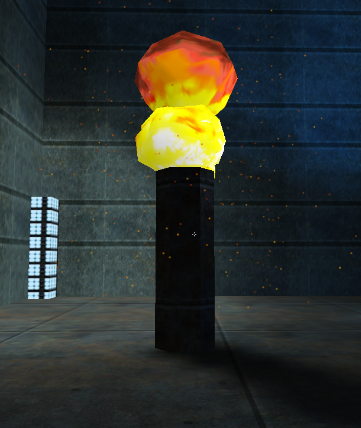
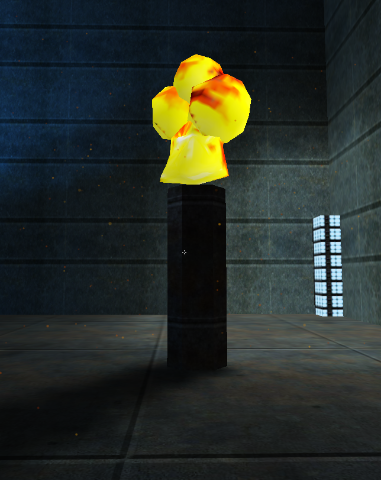
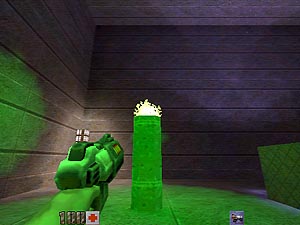
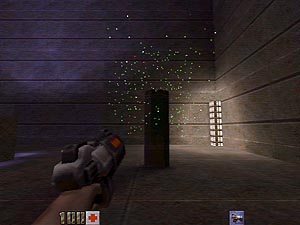
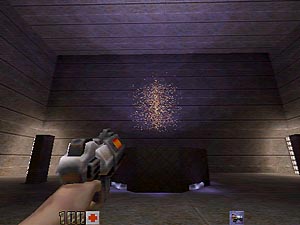
target_temp_entity
A strange ent that spawns a few different sprites. Simply placed the temp_ent where you want the animation to occur and give it a targetname. It must be triggered by something in order to work. Any of the normal options work, like a button, timer, or multiple. After that, give it a style keypair with one of the choices from below.
| # | type |
|---|---|
| 17 | rocket explosion |
| 18 | grenade explosion |
| 20 | green orb |
| 21 | fireworks |
| 22 | imploding clouds |
| 17 | 18 | 20 |
|---|---|---|
 |
 |
 |
| 21 | 22 |
|---|---|
 |
 |
© Deine Mudda 2020